Service explanation for JA-85P 1 Installation Installation must be carried out by certified installers authorised by the distributor. The detector can be mounted on the wall or on the ceiling. In a car it can be placed between the front and rear seats. In terms of detection capability, avoid fast-changing...
JA-85P
Too much choice? Chat or call us at 085-0160316
There are no products in these categories. Shop on.
Service explanation for JA-85P
1 Installation
Installation must be carried out by certified installers authorised by the distributor. The detector can be mounted on the wall or on the ceiling. In a car it can be placed between the front and rear seats. In terms of detection capability, avoid fast-changing temperature devices, such as electric heaters, and moving objects close to body temperature. Blinds for detection are present. Avoid rapid air circulation and do not place objects that could obstruct the view. Keep the detector away from metal objects, which may affect radio communication.
Warning: Most frequent false alarms come from poor projection. Do not switch on the system, when people and or animals are present in the protected area
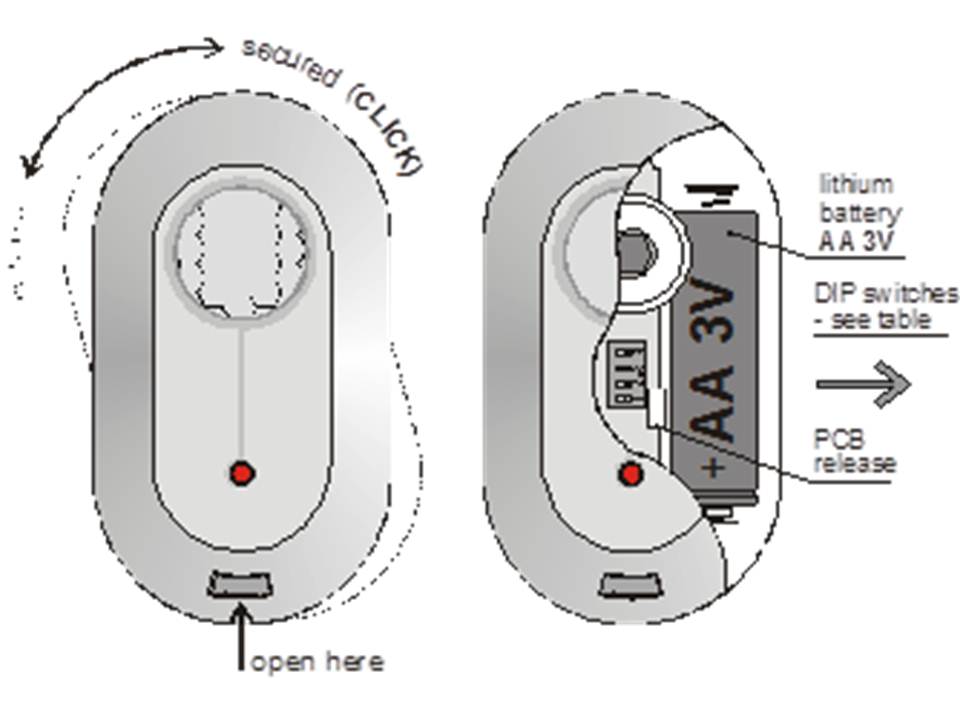
Remove the installation bottom plate (by turning it clockwise).
1. Position the base plate at the projected location and replace the detector in the base plate.
2. Open the detector by pressing the ta on the housing
3. Remove the internal PIR module which is attached to a holder.
4. Set the PIR detector as required. (*see DIP switches, below)
5. Replace the PIR in the housing
6. Do not insert batteries yet and keep the housing Now the detector can be programmed. While the programming mode is open and on the correct zone numbering insert the batteries. The detector will be programmed automatically.
7. After the detector is programmed close the wait until the indicator is off and then test the fuctionality To program a detector nada toe battery is inserted, first remove the battery. Wait 30 seconds and then reinsert the batteries.
8. DIP switches
| # | OFF | ON |
| 1 | Normal insensitivity to false alarm | Over-sensitivity for false alarm with slower response |
| 2* | Inflow delay natural response | No delay natural reaction |
| 3** | Radio supervisie uit | Radio supervisie aan |
| 4*** | 5 minutes sleep modes | 1 minute sleep modes |
* These DIP switches have an effect when the system is used with an auto alarm or with the OASIS control panel. whose zone is programmed. It has no effect if this detector is used with a UC-8x or AC-8x receiver. This is to avoid a notification of lost communication when the car drives away.
*** Saving battery energy . The battery setting automatically goes into economy mode 15 min after the housing is closed. During economy mode, the detector reacts immediately after detecting movement. Then it goes back into sleep mode which is selected 1 min or 5 minutes. However, any motion detection will be ignored during the selected sleep mode. After this period, the PIR detector will transmit another detection when it has been detected. This keeps repeating.
2 Testing the detector
15 minutes after the housing is closed, the LED indicator will light up and transmit any movement detected to the OASIS control panel. However, it must be in service mode. The strength and quality of the communication can also be read.
3 Replacing the battery
The battery quality will be checked regularly. If a low battery voltage is present, the user or installer will be notified. If the battery voltage is low, the detector's LED will light up with any movement detected. The battery should be replaced by a qualified technician within two weeks.
After battery replacement, the detector takes two minutes to stabilise. The Led indicator remains permanently lit for two minutes After the battery has been replaced, test the detector for functionality. Batteries should be returned to the local collection point.
4 Detection range
The detector reacts to movements within a range of 5 metres. * see table below. 